
Buffer Overflow: Exploring Exploit Development

With a few months of diving into the field of Cybersecurity, I have come across a topic that I found very exciting and wanted to share my understanding of it. That topic is Exploit Development. Now in the field of Cybersecurity, exploit development is vastly covered, and what I am going over in this article covers a very basic and small range of what can be learned. My goal is to show those interested in Cybersecurity, Pentesting, etc. that self-taught knowledge can, and will, benefit you immensely, as long as you are willing to put the time and effort in.
Now, before we begin, I wanted to give a HUGE shoutout to Heath Adams (a.k.a TheCyberMentor) and the “Practical Ethical Hacking” course he has supplied on Udemy and his very own site, TCM Security Academy. This course is phenomenal, and it really dives into the concept of ethical hacking. It teaches not just basic exploit development, but python scripting, pentesting strategies, and much more. I have taken my knowledge from his course and extended it in a way to benefit others a little deeper on the topic.
Alright, so let’s jump into the topic of Buffer Overflow: Exploring Exploit Development! First, let’s touch on what the buffer is by forming a quick definition. In regards to memory, a buffer is a location where data is temporarily stored before moving from one location to another. Putting this together with a buffer overflow, as you can imagine, involves sending over large volumes of data to a particular program that causes the data to leak into “adjacent memory locations“ after overwriting that buffer. This overflow of data being sent to a particular program can cause the program to crash or do things that it shouldn’t, exposing it to vulnerabilities, and in turn, the creation of exploits.
“Buffers are memory storage regions that temporarily hold data while it is being transferred from one location to another. A buffer overflow (or buffer overrun) occurs when the volume of data exceeds the storage capacity of the memory buffer. As a result, the program attempting to write the data to the buffer overwrites adjacent memory locations.”

Depiction of a memory stack and buffer location. Credit for image: Coen Goedegebure.
Now that we have a basic understanding of what a buffer and buffer overflow entails, we can jump into the topic of exploit development. Taking the definition from good ole Wikipedia, “An exploit (from the English verb to exploit, meaning ‘to use something to one’s own advantage’) is a piece of software, a chunk of data, or a sequence of commands that takes advantage of a bug or vulnerability to cause unintended or unanticipated behavior to occur on computer software, hardware, or something electronic (usually computerized). Such behavior frequently includes things like gaining control of a computer system, allowing privilege escalation, or a denial-of-service (DoS or related DDoS) attack.” Putting everything together, we can come to the conclusion that a buffer overflow can be exploited to do many things, including taking control of a computer system (this is the scenario we will be covering). Let’s dive deeper into this.
Since we have our definitions and understanding in place, let’s explore this concept a little further by setting up and walking through a basic lab using a well-known vulnerable program, called Vulnserver. This vulnerable program, created by The Grey Corner, is a great starter point in getting a practical experience in Buffer Overflow Exploit Development. Let’s set the basics and what is needed for this lab:
What is needed:
Attacker Machine - Kali Linux (Best if set up in either VMware or Virtualbox)
Victim Machine - Windows 10 : Any Edition (Use Microsoft’s Eval Center; set up in VMware or Virtualbox)
Vulnserver zip file downloaded and extracted onto the Victim Machine
Immunity Debugger downloaded and installed onto the Victim Machine
Lab Steps Summary:
Finding a vulnerable command within the Vulnserver program via Fuzzing/Spiking
Finding the offset using a specific set of characters
Testing the offset by overwriting the EIP section using the set of characters
Weeding out the bad characters that could cause the exploit to fail
Finding a module within the Vulnserver program that has no memory protection
Finding a pointer to use with our payload
Creating a payload and shellcode and gaining root access to the Victim Machine!
Note: if you are needing a walkthrough on how to set up this lab, I suggest researching this on your own. A very handy guide can be found using the course mentioned above, “Practical Ethical Hacking“ by Heath Adams, but there are several free options out there to help you out.
Finding A Vulnerable Command
Assuming our lab environment is set up/everything is up and running (including Vulnserver, Immunity Debugger) we first need to grab a connection to the Victim Machine and check out the Vulnserver program:
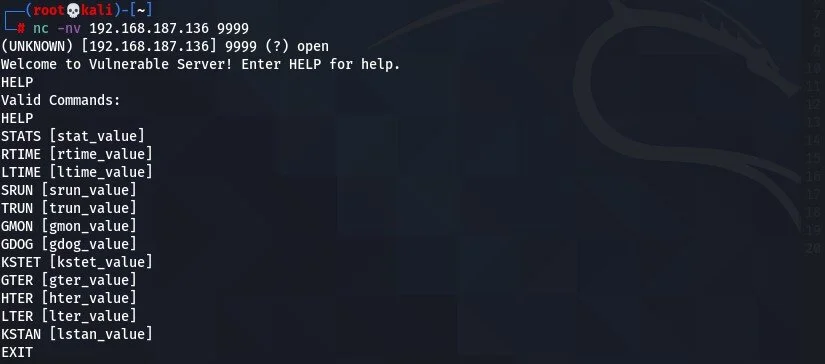
nc -nv 192.168.187.139 9999 is the netcat command used to read the information coming from port 9999, which is the Vulnserver.
Above, we used netcat (nc -nv <ip address> <port #>) on our Attack Machine to connect to the specific Victim Machine, and more specifically, to port 9999. Port 9999 is the pre-defined port that Vulnserver is running on. Then, we used the HELP command that was suggested and found several commands that can be used. In order to save some time, the command that is vulnerable is TRUN. To figure this out, though, we can use a common technique, called Fuzzing, which “is the usually automated process of finding hackable software bugs by randomly feeding different permutations of data into a target program until one of those permutations reveals a vulnerability”. We can fuzz the program by running a python script to continuously send data while opening and closing that connection between the Attack and Victim Machines to see if we can crash the program. Since we will just be executing this script for the TRUN command, we will just show the script for that Vulnserver command:

The python script opens and closes a connection between the attack and victim machine while sending a succession of A’s through port 9999, which Vulnserver is running on.
After executing the python script, we can see some interesting information within Immunity Debugger that tells us we have struck gold and crashed the program:
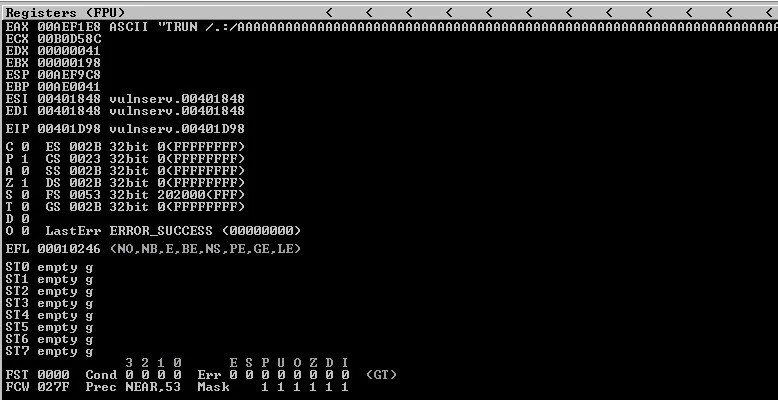
This is the registers section of Immunity Debugger, showing the EAX memory register being overwritten by "TRUN /.:/AAAA….”, which was implemented in the python script

This is shown in the bottom right-hand corner of Immunity Debugger, and shows the program crashed (paused)
In the first image, we can see that the EAX memory register (1st line) was overwritten by the python script’s data, which sent over continuous A’s in a short amount of time. This was our first sign that the program crashed. Our second sign was the status of the program (Vulnserver) running in Immunity Debugger changed from “Running“ to “Paused“ status, indicating something is not right.
Finding The Offset
After finding the potential exploitable command within the Vulnserver program, we need to figure out how many characters were approximately sent out to the program before it crashed (the explanation for this is given later on). We can use the same python script as above, which shows how many bytes were sent. Here are the results after running the same python script as above:

In order to see how many bytes were sent as the program crashed, the python script needs to be manually stopped, therefore CTRL + C was used.
Vulnserver crashed at ~2200 bytes, so we will round it up to 2500, just to be safe. The reason for finding the amount of characters sent to Vulnserver is because we need to find the offset of characters that are written into the EIP memory register. The EIP memory register tells the computer where to go next in order to execute the next command. Knowing this position will help us later to write a precise shellcode that contains a pointer (explained later), which tricks the program into thinking that that’s the next command to execute, rather than the original Vulnserver program code. With that being said, we create a list of 2500 specific characters using Metasploit’s Pattern Create Ruby Script, and import those characters into a python script to execute and find the specific characters that overwrite the EIP:

Above is the command used in order to create the list of characters to import into a python script

Above is the python script that contains the imported set of specific characters in the variable called “offset“
After running the python script above, we can look at Immunity Debugger and find the specific set of characters that overwrote the EIP Register. Once we get those characters we can use Metasploit’s Pattern Offset Ruby Script to find the exact position/number of bytes that it took to overwrite everything up until the beginning of the EIP Registry:

In Immunity Debugger, we can see the specific set of characters that overwrote the EIP are “386F4337“

The exact match at offset 2003 shows that 2003 bytes are written before and up to the very beginning of the EIP Register.
The exact amount of bytes that it took to overwrite the registers above the EIP came out to be exactly 2003 bytes, which we can now test with a different set of characters.
Testing The Offset
In order to test the offset, we can write a python script that writes 2003 A’s, which equals the amount of bytes up to the EIP, then write 4 B’s to see if we actually have the exact match:

Python script that writes 2003 A’s then 4 B’s to the Vulnserver program

EAX and the EBP are overwritten with A’s, which is the hex code 41, and the EIP is overwritten with B’s, which is the hex code 42
The test is a success. With the python script above, we can see within the Immunity Debugger that the EAX and EBP were overwritten with A’s (41), and the EIP was overwritten with 42, or in other words, four B’s.
Weeding Out Bad Characters
To recap, we have found a vulnerable command within the program, exploited the TRUN command and found the offset where the EIP began to overwrite, and tested the offset. Now we need to continue our process with a very important step: finding bad characters that may crash the program after writing and sending the shellcode. We can use another python script in order to find those bad characters that could potentially ruin our exploit. Before showing the python script, we can gather a list of characters here, and import those characters into our script:

List of characters are imported into the python script to be executed. These specific characters start at 01 and go to ff
After executing the above script, we can navigate to the Immunity Debugger and view the Hex Dump for the characters imported into the Vulnserver program:

This is the list of characters in Hex Dump view within Immunity Debugger

This is an example of bad characters that were detected in Immunity Debugger. As you can see, “04, 05, 28 …“ were overwritten with B0, indicating a bad character (B0 will not always be the indication for a bad character). Image taken from Heath Adam’s course noted above
After viewing the list of characters that were sent and viewed in Immunity Debugger, we can see that no specific characters are considered bad, which is depicted in the first image. If we were to see any bad characters, it would look something like the example in the second image above.
Finding A Module With No Memory Protection
Great! Now that we figured out there are no bad characters that could stop our shellcode from working, we need to find a Vulnserver module on the Victim Machine that has no memory protection. The reason for this is because “Memory protection is a way to control memory access rights on a computer, and is a part of most modern instruction set architectures and operating systems. The main purpose of memory protection is to prevent a process from accessing memory that has not been allocated to it. This prevents a bug or malware within a process from affecting other processes, or the operating system itself.“ In order get around this, we need a module that has no memory protection. We can do this by importing a handy tool/module into Immunity Debugger, named Mona, that scans the system and finds specific modules associated with the victim program; Vulnserver in our case:

Above is the Mona Module that was ran to find the module with no memory protection. “essfunc.dll“ is a module with all “False” values, or no memory protection
Looking at the Mona Tool results, we can see that “essfunc.dll“, the very first module, has all “False“ values, indicating it has no memory protection associated with it. Since we have the module with no memory protection, we can move on to finding a pointer within the found module.
Finding A Pointer
Now that we have a good starting point with the “essfunc.dll“ module, we need to find a pointer that contains the JMP ESP command so we can use it to our advantage and “jump“ to our a specific shellcode. We can inherit this JMP ESP command into our shellcode whenever we find the correct pointer to use. So, we first can convert the JMP ESP command into Hex to use with the Mona Tool and write it in x86 architecture, which is what the Victim Machine/program is running on:

Converting the JMP ESP assembly command into Hex
After we converted the assembly language into Hex, we can use the Mona Tool to find a “JMP ESP“ pointer within the “essfunc.dll“ module we can use:

Using the Mona Module, we typed in “!mona find -s ‘\xff\xe4‘ -m essfunc.dll“ and found 9 pointers to try
We have found 9 pointers that we can potentially use. We will start with the first one, “0x625011af“ and work our way down if it does not work with our created shellcode. So, in order to test this pointer out, we can use a python script, similar to the one’s above, but input the pointer value into the script, as such:

Python Script containing the JMP ESP hex code pointer (“\xaf\x11\x50\x62”), but in “Little Endian“ format. This supports the x86 architecture that the Windows Machine (Victim) contains
To test and catch this pointer in Immunity Debugger, we can search for it, create a breakpoint at that “625011af“ location and make sure it falls into the EIP correctly:

Found the location of the “625011af“ JMP ESP and set a break on it by clicking F2. It is now highlighted in cyan, therefore the break is active
After running the python script that contains the pointer, we can view in Immunity Debugger that the break was successful, and the EIP is overwritten with “625011af”:

EIP overwritten with “625011af“
Now that we have a successful pointer, we can go ahead and generate our shellcode and get root!
Generate A Payload And Gain Root Access
Now comes the fun part! We have worked on reverse engineering this Vulnserver program, and it has paid off significantly. Let’s finish the job and create a payload and create a shellcode script that will get us root access. Let’s first create a payload with msfvenom:

Payload created with msfvenom that contains the x86 architecture for a Windows machine and excludes the only bad character of “\x00“
Now that we generated a payload specific for our Victim Machine, we can input that into our shellcode python script:

Python Script that contains the generated payload in order to get root
Alright the moment we all have been waiting for, we can run the shellcode and listen in with netcat to see if we get a successful reverse shell on port 4444:
netcat listener on port 4444 has picked up a reverse shell!
WE HAVE A REVERSE SHELL AS AN ADMIN ACCOUNT!
So, to recap everything, we exploited the Vulnserver program with a generic Buffer Overflow exploit and gained access to the Victim Machine remotely and now we can control everything on that Victim Machine. This is an exciting first step in the world of Exploit Development via Buffer Overflow. It was a fun adventure, and it only gets more interesting from here!
Thank you for following all the way through this long process, but it’s an exciting adventure learning how, not only Buffer Overflows work, but how to develop an exploit from a common issue that programs contain. Please leave comments and reach out to me if you find a mistake within the process!